Day Trading Forex Live – Advanced Forex Bank Trading Strategies

Basics Of Manipulation Point Selection: Part 2

September 27
16:51 2021

If you haven’t read the first article in the series titled Basics of Manipulation Point Selection, I would highly recommend doing so first.

The idea of selecting levels can be entirely mechanical as we pointed out in the first article. These levels can be seen clearly on the charts and have specific parameters that allow the judgment on picking these levels to come easily. Parameters like moving to the deeper level and starting with daily highs and lows are examples of mechanical choices you would make when selecting levels.

However, in some instances, you might have to make a more discretionary decision. Through the rest of the article, we will break down these different discretionary ideas and how we can use them to select better manipulation points.

Selecting the Stronger Level

The primary idea I use when selecting manipulation points is what I refer to as the Stronger Level.

What does it mean to select the ‘stronger level?’ As our goal is to track smart money, choosing the stronger level means choosing the level with a higher probability of holding liquidity. These high volume areas have a higher probability of being a turning point in the market and thus, make for a better or stronger manipulation point.

Let’s get down to some specific examples of what make a Strong Level.

Size of the Level

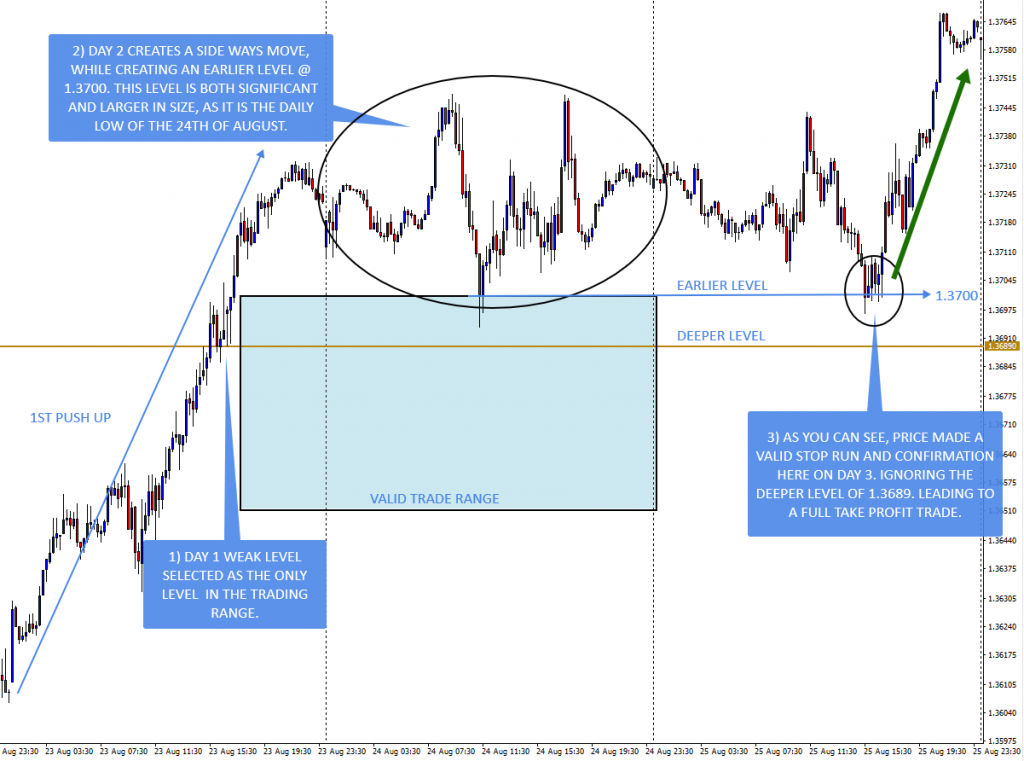
Generally, we only focus on how far the market runs away from the level to establish its validity. In this scenario, however, we need to decide between multiple levels as they’re closer than 20% of the ADR (minimum separation required between levels). So, we need to establish a factor that helps us separate between these levels.

In the previous article, we discussed that you should go to the deeper level as a good rule of thumb when you have two valid levels under the 20% of the ADR separation we require.

However, suppose the shallower level is much larger. In that case, the shallower level could be the better option. 

The question then becomes, “how do I measure the stronger level based on the size”?

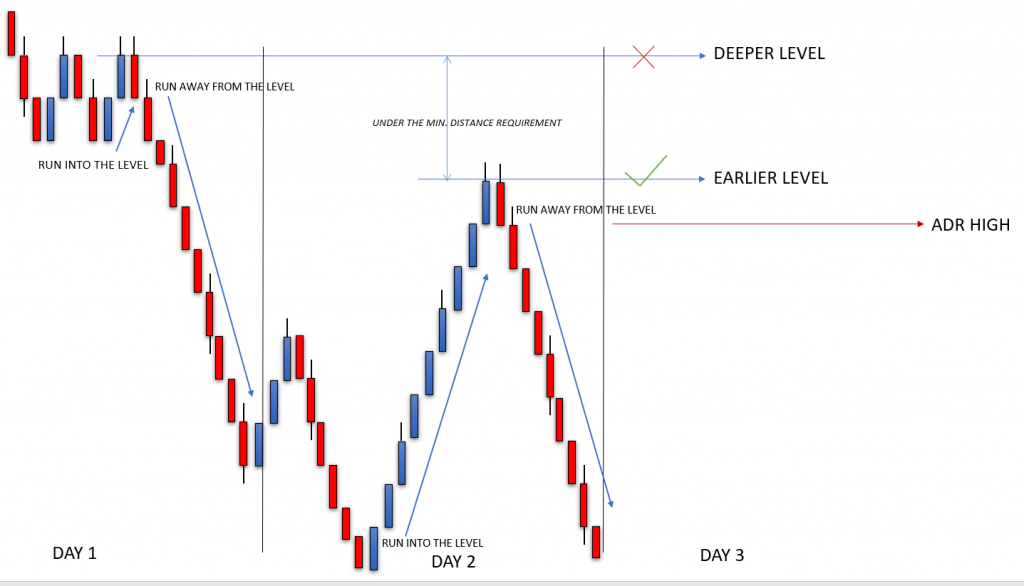
I use the run into a level as well as our standard run away from the level.

In this case, I would measure the run into the level and the run away from the level. If the earlier level is visibly larger than the deeper level then I would likely adjust to this point.

Conditions for application

While this basic idea of going to the shallower level if it’s stronger can be applied in all situations, I only apply this on levels outside the Average daily range (ADR).

The reason is, levels outside the ADR are already extended. As you’re already in an extended market, the shallower level becomes an even more likely target. 

Multiple Tests of the level

Often multiple tests of a specific support/resistance level will increase its strength as a future manipulation point.

Why? Going back to basics, nothing is more well used in trading than support and resistance. Because of that, there is nothing that will condense liquidity like an obvious, or in this case, multiple obvious tests of a support/resistance level.

When a level like that breaks, it becomes a very strong zone of support/resistance, which serves as a great manipulation point should the price come back and make a retest. The picture below is a great illustration of the earlier or shallower option being the better level from which to trade.

Strong Manipulation Points

Recency-bias & Level Significance

When trading in a trending market we often work from weaker levels as they have to be within the 25-65% retracement of the prior day’s push. Because of that, in a trending market, we’re often working from minor retracement points as it’s the only option we have. As the next day forms, however, we’re often presented with other opportunities. 

In the scenario below, if you choose to trade this pair you had very limited options for manipulation points. Because of that, you would have been forced to use a weaker level.

However, the second day gives you a much more significant level, but that level is earlier/shallower than your initially selected level from the prior day. Still, I would go for the earlier level, as it carries more volume and significance. 

TIP: While all of my trade execution happens on the 15M chart, the 1H chart can be a great filter. Simply switch to the 1H when judging between two levels. If one level essentially disappears into the 1H candle (as the weaker level would) while the other still shows as a turning point then you have a clear answer as to the level you should be using.

Conclusion

All three options we discussed are exceptions to the ‘deeper level’ rule of thumb from part one of this article. Going with the deeper option is still an acceptable starting point but this should begin to provide perspective on the balance we maintain between what is the deeper level and what is the stronger level.

Thanks again for reading, and if you have any suggestions for future content or questions be sure to leave them in the comments below.

Kevin Chima

Do you want to trade alongside Sterling and Kevin? Learn more about the DTFL Bank Trading Course, Live Trading Room, and Nightly Market Preview/Signals by clicking the button below.