Day Trading Forex Live – Advanced Forex Bank Trading Strategies

How to Trade Market Manipulation: Part 1 – The Confirmation Entry

July 28
11:01 2021

Having a repeatable entry technique is key for any trader still working towards profitability. At DTFL we use two core trading entry styles to determine when and where Smart Money is entering the market, thus allowing us to ride the wave they create.

First, we have the classic stop run and confirmation entry. The second entry we will break down is the 5 Minute ‘First Failure Point’ entry. This will give you the chance to learn specific rules that can simplify your entry process and hopefully improve your results.

Part 1 of this series will focus on the classic confirmation entry, as I consider this style the simplest of the two. 

Lets get started!

The Classic Confirmation Entry

This style includes 3 components, the stop run, confirmation, and the pullback. Each of which represents a different stage in the process.

It is necessary to point out that we only trade from clear manipulation points. These are areas in the market that we expect to hold large amounts of orders or liquidity. 

As Smart Money must accumulate positions over time, these are the areas where they’re most likely to ‘show their hand’ or intention. Because of that, only stop runs around valid manipulation points are considered tradeable.

Step #1 - The Stop Run

The stop run initiates the confirmation entry by breaking the pre-selected manipulation points by 3% of the ADR or more.

Real World Application: I do not measure 3% of the ADR daily. Instead I use a 3 pip break when the ADR is between 65-100 pips and I use a 2 pip break below 65 pips. For pairs with an ADR of 100 pips or more, the ‘3% break or more’ rule will allow you to adjust accordingly.

Example: 150 pip ADR X 3% = 4.5 pips 


Don’t get to crazy with this rule. 

If you’re a more conservative trader there is no problem rounding up to a 5 pip break where as the more aggressive trader might stick with 4 pips for the time being (I use whole pip which is why I reference rounding to 4 or 5 in this example). 


Your ability to follow the rule (any rule) is far more important than the rule itself, few understand this.

NOTE: For the remainder of the article I will refer to a valid break as being 3 pips for simplicity.

Stop Run Examples

The picture above provides 3 examples of a potential stop run. The first example on the left is INVALID as it only broke the manipulation point by 2 pips. The following two example are both VALID as they broke the manipulation point by 3 pips or more.

Again, for this step, the only thing that matters is the size of the break. Things like whether or not the market closed through the level, the shape of the candle, or any other question you can think of is irrelevant. 

Simply put, if you’re asking anything other than whether the market broke the level by 3 pips you’re asking too many questions. Don’t overcomplicate the process!

Step #2 - The Confirmation Candle

The confirmation candle comes after you get a valid stop run (3+ pip break of the manipulation point). As the stop run candle is only required to break the level, we then look to the confirmation candle to show us whether or not Smart Money is buying/selling into the pre-selected manipulation point.

As illustrated below, a confirmation candle has two basic rules:

Long Setup: A valid confirmation candle will close above the body of the previous candle as well as in it’s upper 1/3rd.

Short Setup: A valid confirmation candle will close below the body of the previous candle as well as in it’s lower 1/3rd.

As explained above, a valid confirmation candle must close above the body of the previous candle in a long setup and below the body of the previous candle for a short setup. 

By also requiring it to close in it’s upper/lower 1/3rd it provides further support that smart money is indeed AGGRESSIVELY buying/selling the break of the manipulation point. 

Confirmation Candle Rules

The picture above presents two examples. Both illustrations start with a valid stop run candle that breaks the manipulation point by 3 pips or more.

Starting with example #1, we have a valid confirmation candle as it closes above the body of the previous candle as well as closing in it’s upper 1/3rd.

Example #2, however, is invalid. Again, the setup starts with a valid stop run candle. This is followed by a bearish candle that does close below the body of the previous candle but it does not close in the lower 1/3rd. 

Step #3 - The Pullback / Candle Count

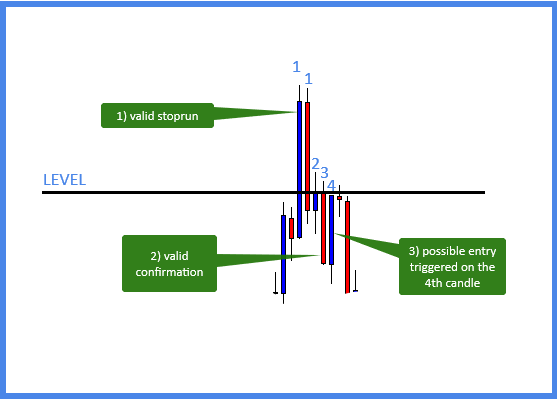
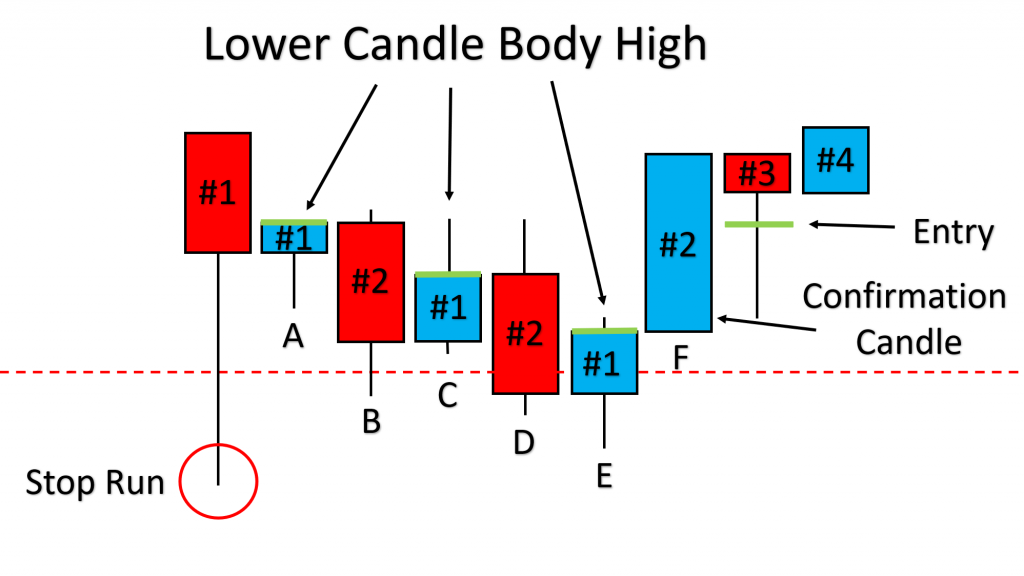
Once you have a valid stop run and confirmation candle in place, the next step is getting the required pullback in the allotted time. 

Let’s start with determining the required pullback. To keep things simple, I recommend using a 20 pip stop loss on pairs with an ADR below 100 pips.

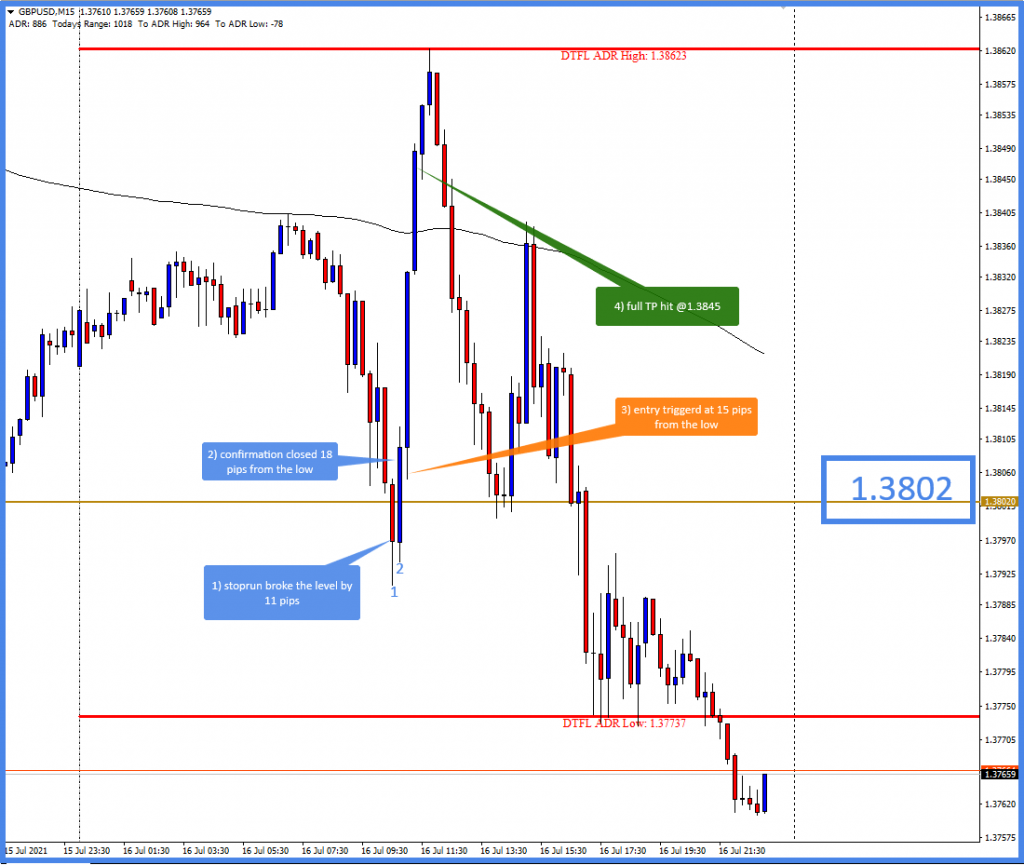
As I want the stop loss beyond the high/low of the stop run candle I will simple measure down/up 15 pips from the highest/lowest point of the current stop run.

When the market pulls back and hits this point, I take the entry with a 20 pip stop loss. The stop loss should be applied from your entry price, NOT the 15 pip retracement line. This is important when taking a long setup. Unlike a short, where you enter at the BID price, when you buy, you buy at the ASK.

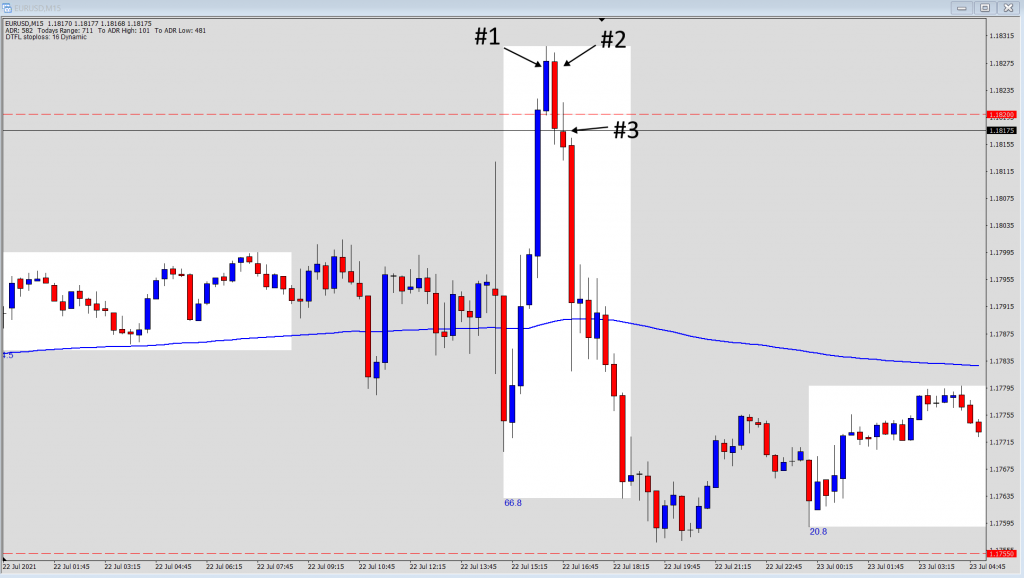
In the example below, 1.2000 is 15 pips above the stop run low (1.1985). If you were to buy when the BID price hit the 1.2000 level you would actually get a fill price of 1.2001 (if there was a 1 pip spread, 1.2002 if it was a 2 pip spread, etc.)

Whatever the actual fill price, that is what you apply the 20 pip stop to. A short setup is a bit more straight forward the BID/market price you see on the screen is where you get filled.

As part of the pullback process, we also have a time limit on the setups we’re considering. The basic reasoning behind this goes back to the core idea of the entry.

If Smart Money is truly buying into a lower manipulation point or selling into an upper manipulation point then the price will often rapidly move away from this point immediately following the stop run. When this does not happen, the probability of a successful trade is greatly reduced.

Because of that we also need to get the pullback within 5 candles. Let’s break down the nuance of this rule further.

As you can see, the count begins when you get a valid stop run. Anything before that is irrelevant, and remember, your stop run must be a 3 pip break of the level or more.

The example above also shows how the number one candle in the count can start over. In the case above, we are dealing with a sell-side setup, so when a new candle forms creating a higher candle body low, the count resets. This continues until you get a confirmation or have two consecutive candles which open and close beyond the manipulation point. If 2 consecutive candles open/close beyond the manipulation point, the trade is tossed and we move on to the next.

See this concept displayed below.

Candle Count Example

The first #1 candle starts the count as it breaks the manipulation point by 3 pips or more. 

Candle A resets the count and becomes the new #1 candle as it has a lower candle body high when compared to the prior #1 candle.

Candle B is candle #2 as it does not set a lower candle body high.

Candle C again resets the count by producing a lower candle body high. Still no valid confirmation candle.

Candle D is now the second candle in the count as it does not set a lower candle body high.

Candle E is the final candle count reset as it agian produces a lower candle body high as compared to the prior #1 candle.

Candle F gives us a valid confirmation by closing above the body of the previous candle as well as it its upper 1/3rd.

IMPORTANT: The candle count locks once you have a confirmation candle.

Once the confirmation candle occurs, you have the green light for entry which is provided during the pullback of candle #3.

Now you understand the three stages of the standard Confirmation Entry. Next, lets look at a trade we called recently in our member area.

Recent Trade Examples

Everyday, as part of the DTFL Bank Trading Course, we do a daily market preview which details our directional bias (when a valid market cycle is present) as well as the exact manipulation points we will be trading from the following day. 

The first picture is a screen shot which lists the pre-selected manipulation points for the following day.

The second picture breaks down the actual trade setup which occurred 12 hours after members were given the manipulation point.

As you can see, this is a picturesque setup with a classic entry. We had a stop run of 11 pips (Candle #1), way over the 3 pip minimum, and a solid confirmation on the next candle.

The confirmation candle (Candle #2) closed above the previous candle body high and well within the upper 1/3rd. The entry was taken on the 3rd candle in the count when the price retraced to 15 pips from the low, after which price moved straight to our take profit.

The next example comes from July 22nd. The Wednesday Daily Market Preview is a bit different as it is done live in the DTFL live training room. 

As you can see this was posted Wednesday @ 5:40 PM, over 16 hours prior to the entry.

The next picture breaks down the entry. As you can see candle #1 provides the stop run and candle #2 provides a valid confirmation candle. Candle #3 provided the required pullback to take the entry which was quickly followed by a rapid downside movement and full take profit.

EUR/USD Short - July 22nd 2021

Hopefully this article illustrates the power of the confirmation entry as well as giving you a start to trading with it!

Thanks for reading and if you have any questions or suggestions for future content, feel free to leave a comment below. Also look forward to part two of this series, where we will break down the 5 Minute ‘First Failure Point’ entry in detail!

Happy trading,

-Kevin Chima